In-Place Text Editing of SubItems in TreeListView
Created: 28 August 2013
In this article we are going to explain how to use different ways to edit the text of subitems in IntegralUI TreeListView control. The TreeListView has a built-in support for label editing which can be used for each item or subitem individually. Furthermore there is an option to use TextControl which is an in place editor displayed on demand for specific subitems. Also we will present how to add your own custom editor for all subitems in specified column.
Using LabelEdit for SubItems
The LabelEdit option is aleady built-in in TreeListView, to enable its use for subitems we need to set the LabelEdit property to true and AllowSubItemSelection property to true:
this.treeListView1.LabelEdit = true;
this.treeListView1.AllowSubItemSelection = true;
Me.treeListView1.LabelEdit = True
Me.treeListView1.AllowSubItemSelection = True
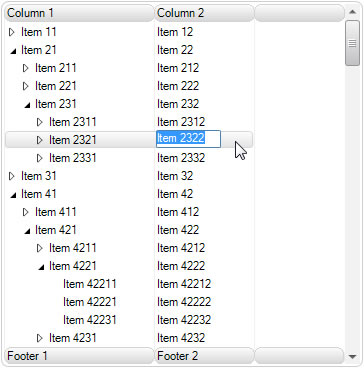
The AllowSubItemSelection must be set to true, otherwise we cannot select subitems. With label editing enabled, whenever a mouse click is made inside subitem space, after initial delay of 500 miliseconds, a TextBox will popup in which we can change the text of clicked subitem. If we press on Escape key, the change will not be applied. In order for a change to be accepted, we must press the Enter key.
The editiing process is accompanied by two events which we can handle and add our own code. These events are: BeforeLabelEdit and AfterLabelEdit. By handling the BeforeLabelEdit we can decide whether we want to cancel the editing before the textBox is displayed. For example the following code will allow only editing of subitems in second column:
private void treeListView1_BeforeLabelEdit(object sender, LidorSystems.IntegralUI.ObjectEditEventArgs e)
{
if (e.Object is TreeListViewSubItem)
{
TreeListViewSubItem subItem = (TreeListViewSubItem)e.Object;
// Only allow editing of subitems in second column
if (subItem.Index != 1)
e.Cancel = true;
}
}
Private Sub treeListView1_BeforeLabelEdit(ByVal sender As Object, ByVal e As LidorSystems.IntegralUI.ObjectEditEventArgs) Handles treeListView1.BeforeLabelEdit
If TypeOf e.[Object] Is TreeListViewSubItem Then
Dim subItem As TreeListViewSubItem = DirectCast(e.[Object], TreeListViewSubItem)
' Only allow editing of subitems in second column
If subItem.Index <> 1 Then
e.Cancel = True
End If
End If
End Sub
For more information on how to handle label edit events read Programmatically editing of tree node in TreeListView .NET control.
LabelEdit will become only active when a click is made over subitem text. However if a column width is longer than subitem’s text, and the click was made outside of text area, the TextBox will not popup and we cannot edit the subitem’s text. We can solve this from code by handling the Click event and programmatically start the edit process. Here is how:
private void treeListView1_Click(object sender, EventArgs e)
{
if (this.treeListView1.LabelEdit)
{
Point mousePos = this.treeListView1.ContentPanel.PointToClient(Control.MousePosition);
// Locate the parent node to which this subitems belongs
TreeListViewNode node = this.treeListView1.GetNodeAt(mousePos);
// Get the subitem over which mouse click was made
if (subItem != null)
{
RectangleF textArea = subItem.TextRect;
textArea.Size = subItem.TextSize;
// If subitem is clicked outside text area, start manual editing
// Useful when subitem text is empty
if (!textArea.Contains(mousePos))
subItem.BeginEdit();
}
}
}
Private Sub treeListView1_Click(ByVal sender As Object, ByVal e As EventArgs) Handles treeListView1.Click
If Me.treeListView1.LabelEdit Then
Dim mousePos As Point = Me.treeListView1.ContentPanel.PointToClient(Control.MousePosition)
' Locate the parent node to which this subitems belongs
Dim node As TreeListViewNode = Me.treeListView1.GetNodeAt(mousePos)
' Get the subitem over which mouse click was made
Dim subItem As TreeListViewSubItem = Me.treeListView1.GetSubItem(node, mousePos)
If subItem IsNot Nothing Then
Dim textArea As RectangleF = subItem.TextRect
textArea.Size = subItem.TextSize
' If subitem is clicked outside text area, start manual editing
' Useful when subitem text is empty
If Not textArea.Contains(mousePos) Then
subItem.BeginEdit()
End If
End If
End If
End Sub
In this way the TextBox will always popup whenever a subitem is clicked, and we can edit its text.
Use of TextControl as In Place Editor
The LabelEdit has some flaws, mainly there is small delay before editing starts and also this works with mouse only. In order to start the edit process from keyboard we need to manually add the necessary code for this type of functionality.
The better way is to use the built-in TextControl which acts as in place editor for subitems. Each column can show different kind of in place editors. By setting the ContentType of specific column to TextControl, a text box will appear on demand whenever a subitem is focused and editing mode is enabled. When we finish with editing process, the text box will hide and we can continue with navigation to other subitems. The best part is that this works both with mouse and keyboard, and all functionality is already built-in. The only settings from your side are to allow subitems to have input focus and setting the column ContentType to TextControl:
// This is required for navigation with keyboard among subitems
this.treeListView1.AllowSubItemFocus = true;
// Edit subitems in this column using TextControl
column.ContentType = ColumnContentType.TextControl;
' This is required for navigation with keyboard among subitems
Me.treeListView1.AllowSubItemFocus = True
' Edit subitems in this column using TextControl
column.ContentType = ColumnContentType.TextControl
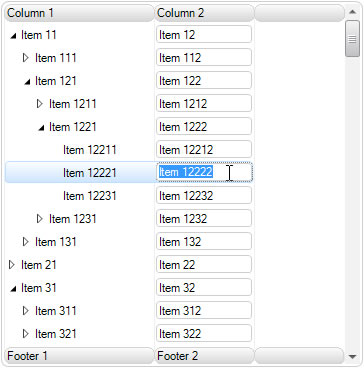
By default, each subitem will draw the TextControl inside its space, but only when subitem is focused and in edit process the TextBox will popup, otherwise it will remain hidden. You can customize the appearance of TextControl by using the ColorStyle like this:
if (column.ContentType == ColumnContentType.TextControl)
{
if (column.ContentControl is TextControl)
{
// Optional: Hide the border of TextControl
TextControl ctrlText = (TextControl)column.ContentControl;
ctrlText.ColorStyle.BorderColor = Color.Transparent;
this.treeListView1.Invalidate();
}
}
If column.ContentType = ColumnContentType.TextControl Then
If TypeOf column.ContentControl Is TextControl Then
' Optional: Hide the border of TextControl
Dim ctrlText As TextControl = DirectCast(column.ContentControl, TextControl)
ctrlText.ColorStyle.BorderColor = Color.Transparent
Me.treeListView1.Invalidate()
End If
End If
While editing the subitem text inside the TextControl, we can press the Escape key to cancel and close the edit process. Also when Enter key is pressed, the change is applied to the subitem text. The difference between LabelEdit and using an in place editor is also in events rthat are fired.
When using in place editors, the Value property of subitems takes the value of the editor first prior converting that value to subitem text. Also in this process two events are fired:
- SubItemValueChanging, firee when editor is shown but prior any change is made to the subitem value
- SubItemValueChanged, fired when editor is closed and the change it comitted to the subitem value
We can cancel the editing process by handling the SubItemValueChanging, check whether some conditon was made and if not we can set the e.Cancel property to false.
A sample project in C# and VB is available for download from here: Text Editing of SubItems in TreeListView